Tuesday, May 06, 2014

Cinco Star Enchiladas

I hope you all had a festive Cinco de Mayo! In the spirit of the holiday I give you a fresh tasty twist on enchiladas!

Since Justin and I stared eating vegetarian/vegan, it's been really fun trying new recipes that are plant strong.  Changing our diet has made us both feel so much better and have a lot more energy!
 
We were both huge fans of chicken enchiladas so I wanted to try a veggie version.
 
Step 1: Pick all and any veggies you want! I usually use this combo with the exception of the zucchini and squash.  I usually use orange and yellow peppers but didn't have any so I opted to try out these!  I use the avocado to slice and eat on the side.
 
 
The magic of this recipe is this enchilada sauce.  IT'S AMAZING! AMAZING, AMAZING, AMAZING!

 
Step 2: Chop/slice all your veggies and sauté them on the stove with some of the enchilada sauce.  Sauté until all veggies are softened.

 
Step 3: Pull out your tortillas and fill with the veggie mix. Spread a little of the enchilada sauce along the bottom of the baking pan to prevent sticking and add a little more flava.  Place rolled enchiladas in pan and top with a little more sauce and cilantro.  Bake at 350 for about 15 minutes. Or until warmed through.

 
Step 4: Remove from the oven and serve!  You can add salsa, avocado or whatever you want on top of the enchiladas!  You can serve with chips and salsa, rice or whatever you like. 

 
This recipe can be personalized to whatever you desire, the magic is in the sauce! 
 
Bon Appetite!

Monday, May 05, 2014

Mother's Day Wishlist

I know blogging mamas worldwide are blogging their wish lists for the impending, mother loving holiday.  Well, I'm going to also!

 
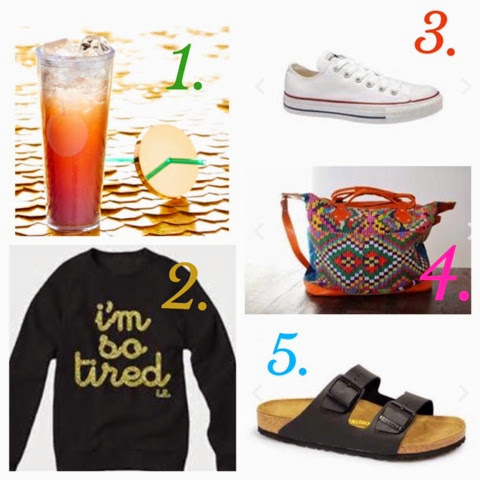
I am all about comfort.  I like getting dressed up like every other lady but as a stay at home mom, my main uniform consists of hoodies and yoga pants. My closet is full of basics.   I like pieces that are easily switched with others and easy to accessorize.  Stepping into some nicer weather, here are some new yet comfortable things that I would love to add to my closet.
 
1. This Starbucks cold-cup is so cute! I love the warm spring colors and this would definitely add a little flare to any outfit or stroller cup holder.
 
2. This sweatshirt is the epitome of how I am feeling lately.  We're having some major sleeping battles going on and I just want to wear this!
 
3. The classic white chuck taylor is definitely a staple piece.  I have a pair since I have had since High School.  I need a fresh pretty new pair.... like yesterday. 
 
4. I have been coveting these Nena and Co. day bags for over a year. Each bag is hand loomed and one of a kind! Not only is Nena and Co a green company, but also "Peace Pilgrims", helping others in need!
 
5. I am hopping on the Birks bandwagon.  They are so comfy and easy to just slide on.  I'll take one in each color please!
 
What's on your Mother's Day wish list?!

Ottoman Makeover


A couple years ago, I picked up two of the most basic of ottomans from IKEA.  With hopes and dreams of making amazing covers for them, I did manage to make a somewhat decent cover for one, while the other was left to rest naked in the basement.
 
 
In February, Cru spent a night very sick with temperatures of over 100 degrees.  That was the night the second ottoman got a second chance.  I ended up sleeping in that chair that night so I asked my husband to bring it up from the basement for me.   I loved it so much, it stayed.  However, it needed some love.

I spent a while mulling over what color/pattern I wanted to cover it in.  Crus room is already so bright with lots of different patterns and textures, I wanted to be careful not to choose something that would compete.  On the easy side, his room also allows for the use of any color.  So that left my pallet with lots of options. I get overwhelmed in fabric stores so I was thrilled to find this fitted sheet in the kids section of IKEA.  The green color is a solid so I knew it wouldn't compete with all the patterns in the space and the green color would pull out the green in some of the art in the room and pull your eye off of the blue and red which has a heavy presence in his room!  For $6 I had my ottoman cover!
 
 
If I wanted to spend the time (which I didn't) I could have cut and sewn it to the perfect size and create an attachment system so I can remove and wash as needed.  Instead I pulled out my staple gun, flipped the thing over, pulled it tight and stapled away!  I was prepared to cut away the extra fabric underneath but was able to just staple it out of sight.  Kind of a ghetto method, but it worked for me and what the eye can see looks great!
 
Here she is!
 
 
I really love the way it looks in Cru's room.  It pulls from the greens in the Vintage Disney attraction posters behind the chair and on his desk.  Easy peasy! 


Tuesday, March 25, 2014

Hello!

I apologize for yet another lull here at the DD blog. We have been computerless since my last post and I am so sorry!!  Anyways I'm back and ready to rock!

Domestically Dobson will be undergoing a transformation in the next couple weeks. While keeping up with our never-ending home remodel, I would like to add more of my lifestyle to this blog.  Now that I'm a mama I want to share more of my daily happenings as a stay at home mom, crafter and everything in between! 

The blog will be getting a new look, hopefully some new awesome collaborations and an all around change up! 

So stay tuned and thank you for sticking with me! I am extremely excited about this!

Xo
S

Monday, November 11, 2013

Easy DIY Fall Yard Art

I was browsing some local shops as I often do to get ideas for fun DIY projects and I came across some outdoor yard signs that said "Happy Halloween".  They were super cute but at the price tag of $30, I knew I had all the resources at home to make this myself and couldn't justify spending the dough... 

So I went home and made my own!

Supplies needed:
Scrap wood
Wood stain
Exterior paint
ABC Stencils
Pencil
Small paint brush 
Saw (if board is bigger than needed)


First I took the stencils and traced out what I wanted on the sign. (Yes, I realize my ' is in the wrong spot. Don't worry I fixed it)


For this sign I wanted it to say "It's Fall Y'all" so I set up my stencils and went to work. I also used a smaller set of stencils I had to make a "No Soliciting" sign. I've been wanting one for a while so I just made one. 


After this step was completed I covered the board in one coat of some wood stain I had on hand. Any color will do. 

I was able to still see the outline of the stencils so I filled the lettering in using a small paintbrush and extra exterior white paint we had on hand. 


When I was done filling in the letters and everything was dry, I had Justin cut the signs to size.


I want sure how they would turn out but since I had all the materials on hand I figured it was worth a try!
Now they're proudly displayed out front! 


For a project that cost free.99 I think they turned out pretty great! Now I'm excited to make some for Christmas decor!

Wednesday, October 16, 2013

Pumpkin Patch 2013

Last week we visited the Spooner Farms pumpkin patch! I was fighting a cold but sucked it up so we could enjoy the last beautiful day of the season and capture some memories of Cru's first pumpkin patch adventure!


Mt. Rainier was out and looking handsome next to my studly men. :]


Cru was highly distracted during most of our photo ops but I think he liked it!  It was definitely a sensory overloaded experience for the little guy!


Be still my pumpkin loving heart.  This kid is so stinking cute!


We sat Cru down next to some little pumpkins and decided the first one he grabbed we would take home!


The farm had a cute height chart we stood Cru up against.  Justin said he's going to make him pose there, every fall until he's 18.  HAH!


We visited the animal barn which had some chickens, turkeys, piglets and bunnies.


Outside we found a giant spider.  At least he was a happy spider!


If you follow me on Instagram, you would have seen a little photo collage I posted. It was such a fun evening and we look forward to doing it every year with our little family!


It's Fall Y'all - Outside Edition

I already showed you our fall decor inside the house, now step outside with me for a quick look at what we did out there...

We didn't decorate very much, only around the front door area.  I grew up in a home where the decor was always autumn related instead of Halloween related so that's what I like to do too! 

Here is the front door area. Just a couple of potted mums, some pumpkins, a home made wreath and a couple of home made signs.


The pumpkins came from Spooner Farms.  We went on a family pumpkin patch outing this past Monday (more on that later this week :]).  Our front stoop area isn't very big so we stuck with some more modest sized pumpkins.

This also home to a quick DIY sign I made a couple weeks ago.  I have a full tutorial on that coming soon too!

I love white pumpkins.  I think they are so pretty and they compliment our screen door so well!


I also made a "No Soliciting" sign for our front door to keep all year round.  We have a lot of door to door people in our town so hopefully this will end that! :]


I hung my home made wreath on our newly painted screen door.  I didn't document how I made it but it is a wreath form from the dollar store, some extra ribbon and an extra fall garland I had on hand.  I also had the "d" lying around so I fastened that on there to add a personal touch.  It was free, easy and adds a lot to the front of our home!


Between the paint color, screen door, brick chimney and fall flava happening here, I am in love! I think it looks so good!  Next spring we will be getting a new roof and adding some landscaping that lasts all year round so it will just keep getting better!


Happy Fall Y'all!