Showing posts with label Excitement. Show all posts

Thursday, January 17, 2013

Master Look

I spent a lot of time thinking about what I wanted to do with our Master Bedroom...

I want it to be a comfortable space for Justin and I and something we both love.  I don't want it too masculine or too feminine but a space we both enjoy  I am very into the globalist look right now.  I love white walled rooms with punches of colors, textures and am especially in love with the southwestern/aztec like patterns that are out there.  Luckily the white walls give such a neutral base that all that is really needed to give the room some flava is some throw pillows, wood/natural accents and some green.

Pinterest has made my love for the globalist look grow and grow.  Here are some examples I specifically love.

Pinned Image Pinned Image
                                              Source                                                          Source
Pinned Image
Source
 
We purchased our curtain rod from Lowes.  It has a good masculine feel with the dark wrought iron look but has a hint of femininity with the crystal finials.  I also like these because they will allow me to bring in black accents throughout the space. 
 
Source
 
I found these fun pillows on Etsy and other sites but there is no way I will pay more than $15 for a pillow.  So I will be going fabric shopping very soon! These will add the global feel we want for the space.
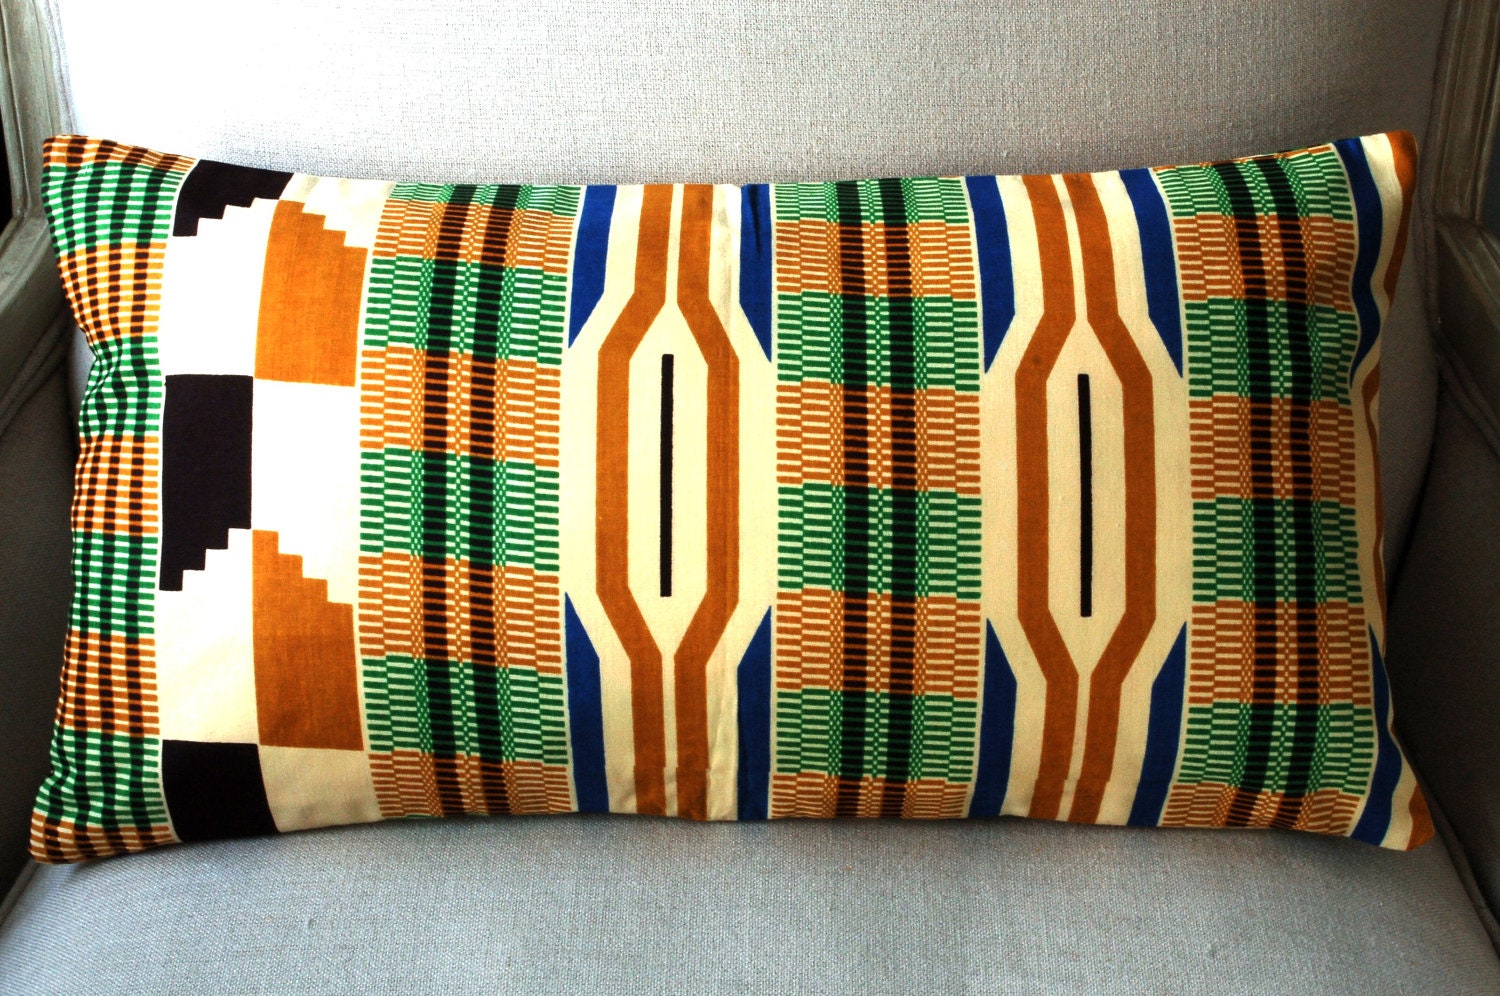
 
Kente Home Style Lumbar pillow cover - 12 x 22 inches - Green Blue 
 
Cushion Cover Vintage Green and Turquiose Aztec Limited Edition  Fabric 
                                                     Etsy                                               Source


We also purchased this light from Lowes.
 
Portfolio 6-Light New Century Black Chandelier
 
To change up the look I am going to use these light bulbs from Lowes as well.  I thought it would add a unique look to the light fixture.  Here's hoping I'm right!!
I also need to get a couple of lamps for our night stands.  I am deciding between a few different looks; an antique studious look like this red one is one of them.  Not sure about the color I'm thinking I need something in a dark finish to tie in the curtain rod and chandy...  Justin specifically mentioned this style so it would be nice to incorporate something he wants. =] 
Another option I'm into are these wall sconces... I would definitely spray the base black though and the third option I'm thinking is this lamp. I think it would be a subtle addition to the room where we already have some crazy patterns and bold colors.
 
JONSBO BÄRBY Table lamp IKEA Dimmer function allows the light intensity to be adjusted.BAROMETER Work lamp IKEA Adjustable arm and head makes it easy to direct the light. ÅRSTID Wall lamp IKEA Adjustable head makes it easy to direct the light. Fabric shade gives a diffused and decorative light.
 
 
I really don't know what the best option would be...  I may have to purchase one of each and just try them out!
 
I am obsessed with the Fiddle Leaf Fig and would absolutely LOVE one in our room!  They look like they can get pretty big and I will need to research how to take care of them but aren't they the coolest!
 
Pinned Image
 
I also want to have a little photo wall (shocker!) and will of course add some fun accessories.  The same theme will run into the bathroom so that there is a cohesive feel between the spaces. I am so ready to have our room done so we can focus on the nursery! 


Thursday, February 23, 2012

P R O G R E S S!

Sorry for the delayed update but we have been BUSY!  My in-laws are in town and my fa-in-law and hubs kicked some serious behind in our master bathroom and bedroom.

Last week I left you with this photo...  Not much to look at but an uninsulated room and one piece of green board up...

This past weekend, Justin and his dad finished insulating the entire space, framed out the closet area and worked on getting the rest of the green board up.


Then my father-in-law started mudding and taping the entire room.  This was something hubs and I didn't know how to do so it was great to have him help us with it and to learn!  He applied 3 coats of mud over the seams and screw holes.  In between each layer of mud, he sanded down the dried previous layer.  This is done to ensure a smooth finish as you get to that last layer.


So now the room is all mudded and taped! (woot!) We left off a section of the green board in the closet area for attic access.  We will create a door for this area a little later.

While waiting for mud to dry, we added another task to the to do list. In our bedroom, the window wall is on the weathered side of the home.  This side of our house has the sun beating on it in the Summer and the rain and cold in Winter.  We tore down the walls to add thicker insulation so we would be warmer in the Winter and cooler in the Summer.


Adding insulation will be a common theme in the Dobson home.  The existing insulation is probably 2 inches thick and is doing nothing for us.  Adding new insulation in the walls and crawl spaces will lower our heating bill and keep things much more comfortable.


With the addition of insulation to this wall, we are also adding a new window.  We chose one larger window instead of the two smaller ones.  It will make more of a statement and add the Master to bedroom.  My fa-in-law is coming back in a few weeks and that is when we plan to install the window.  We will need to set up scaffolding on the exterior of the home so there is lots of set up and work involved.


Now that this step is done, Justin and I can start working on it our selves.  We will add texture and paint to the master bed and bath walls, then will tile and grout the bathroom floor, create closet doors and add all the fixtures and carpet.  Were hoping to go lightening speed from here and finally move into our master space.   

We still have lots to do including checking off the checklist from the main level and we will keep you posted all along the way!

Thursday, January 19, 2012

Living Room Upgrade!

We've made some changes in the living room and we LOVE it.  By completing our upgrade we were able to check off some items on our to do list.
Here is our new living room layout! The wall color is looking very yellow in these photos so I apologize...
I moved the bottom part of the buffet that was in the dining room to the back part of the living room.  I took off the top part of the buffet and added the mirror that was on the mantle...

We have always wanted the living layout like this and were only able to because we got a new T.V.!  We moved some pictures around and the small bookshelf was placed under the window for components and other things....


We also added a new light fixture by the front door.  It used to be a rusty nasty thing but we upgraded it to a new but vintage looking fixture...


Looks great!  I still need to polyurethane that closet door!


So as far as our "To Do" list goes, here is what we've completed:

Front Door Light: The light in our entryway consists of a bulb hanging out of the ceiling. I want to find an inexpensive, yet vintage inspired fixture to place here.
Bathroom Fan: Our main floor bathroom fan is NOT cutting it. You can see the moisture on the walls and our shower curtain rod is showing rust spots. This is something that needs to be addressed ASAP before the moisture starts breeding mold! EEEK!
TV: Our weird flat screen/tube television set has proved to be nothing but an awkward eyesore for the living room. We would like to upgrade to an ACTUAL flat screen that could be put in a more fitting location and provide one focal point in the space.
Vent Oven Hood: We have a hood above our oven, but now we need to vent it so that it will actually take the cooking air outside so our smoke alarms won't go off on a daily basis.
Stickem Linoleum: Our entry landing and steps at the garage and basement doors has tired nasty stickem linoleum that show every dog hair, dirt and whatever else gets dragged in. We want to purchase a darker linoleum to put there to give it a fresh look and hide some of the grime.
Caulk Moulding: The baseboard in our living and dining room needs to be caulked. We have the caulk, now we just need to do it!
Clean Paint Off Hallway Floors: I was a little bit messy in painting the baseboards in the hallway. There are a few areas where I accidentally got some paint on the floor. I purchased some Goof Off wipes that I will review and used to clean up my mess.
Dining Room / Kitchen Revamp: I'm tired of all the tan. It's broken up nicely in the living room with color and such but the dining room is baaaaad. The tan walls with oak trims and table is not working for me. My plan is to paint the dining room and kitchen a lighter beige color that will create a cohesive look with the two spaces but will also compliment the darker tan I have going on in the living room and hallway. I also plan to make some new window treatments and recover the dining room seats for a fresh, new look. I also want to paint the open cabinet backs an accent color to break up the white and add a little flare.

Stain Closet Door: It took a blog photo for me to realize that I need to do this.  So I am adding it to the list!

Working on the dining room and other project now! These snow days are making very productive days in the Dobson home!

Wednesday, September 21, 2011

Let's Take it Out Back...

The sun is shining, the Angels are singing and this chick (thumbs point to self) is one happy lady!
For a loooooooooooooooooooooooooooooooooooooooooooooong time now, I have been posting about doing our back yard. "Were going to work on it soon", "Going to start it soon", "just kidding, were going to work on the upstairs instead", blah blah blahbity blaah!
Well, FINALLY! We have started the process of the backyard overhaul! This past Saturday we hired someone to come out and create a blank slate for us to create our backyard oasis.
Here is the lovely before. Please note the many different types of dead grasses and weeds as well as the graveled section and puppy created dirt pits. It was a doggone mess (no pun intended) and I am so happy were on our way to having an outdoor space we can use and enjoy.

Justin was equally excited about the excavation that was about to take place...

but the pups were a little concerned for the well being of their domain. They sat in that spot for hours until they were allowed to go out and run around with the tractor. :]

The first step of the excavation was to scrape the top layer of crud and bury it.  Jerad (Mr. Excavator) then leveled and feathered the dirt to make nice even ground.

4 hours and $260 later, here is the finished product! The next phase, that will take place this coming weekend is a sprinkler system and after that we will seed the yard and hopefully get some luscious grass!

Fun Fact:  About three feet under the surface of our land the dirt becomes this black sand. Jerad said it was the first time he'd ever seen anything like that! I wonder if its volcanic or something? I love a good mystery.

So after the irrigation system is in and the grass is all strong and beautiful, this is what we have planned... 

Here is a little layout I created on Powerpoint. Most of this will happen next Summer but if weather permits, we can work on it over time until then.  I would like to have a small deck off of our french doors that I could put a rocker or something like that. We are going to lay a patio, create a solid surface area for our table and chairs and build an outdoor seating area surrounding a fire pit.


I am quite the Pinster (Pinning Gangster - Pinterest) lately and have found some inspiration photos.

Our folks are giving us 43 2x2 pavers for FREE and we are going to use them to create our patio space. I know that I want to stain them to a warmer tone (they are a cement grey) and I would like to position them like the photo below.  I love the grass look in between each stone and it will stretch our paver square footage to the maximum since we only have 43.

I also want to incorporate a little DIY into the space. I have been saving wine bottles and think this project would be the perfect way to use them. They would have to be citronella because the mosquitos love me and I want to attach them all along our fence line. Love this idea!


Another DIY project I want to incorporate is a drink cooling area like the one below.  In the picture they have the metal bins in the middle of a picnic table which I like but I also think it would be cool to use the same type of boards to create a more elevated counter surface and have the metal bins running along the back of the counter to create more of a bar setting.... maybe i'll do both!

The big statement piece for the backyard would be a built in bench.  My father-in-law is a mason and I know this could become a reality.  I could then use my novice sewing skills and try to whip up some custom cushions. I want to have it surround a fire pit to create the ultimate campfire setting.


So many things to look forward to in this outdoor space. I can't wait to have a place to entertain and to use as an extension of the house next summer. 

Thursday, July 21, 2011

Switching Gears

Remember a while back when I told you were going to start redoing our backyard? 


Well, now were not... yet.

We received a bid to level the back and dig for sprinkler systems in both the back AND front yards and were very excited that it came in less than we thought it would be :]

The reason for the hold off was the advice from the landscaper that we should wait until September.  He seems to think the sod/seed (whatever we decide to use) will better thrive.

Soooooooo....  Were goin up (stairs) and working there!

Our first step will be some work on the bathroom.


You see, we have been really bad and lazy lately.  We have framing to finish in here and green board to put up and have the supplies for this but just haven't done it yet.....BAD.  I posted our bathroom plan quite a while back, see that here.

We need to get some more insulation, throw the green board up and then the plan is to get some hardy backer down and start tiling this baby!

I can't wait for vintage looking tile to go down. It's going to look Grrrrrrrrrreat with our claw foot tub.

SEE!


After that will come two new pedestal sinks, new toity, hardware for the claw, lighting, mirrors and of course decor!

I am sooper dooper excited to get going again, its been wayyyyyy tooo long!

Wednesday, June 29, 2011

Current Look: Outside

Ahhhh, the outside.  There is so much work in store for us here.

Here is the front yard.  We are leaving this be for now. We did paint the house (ourselves), had the chimney crowns added and chimneys inspected by my father-in-law and planted some plants, which you can see haven't quite bloomed yet.  Summer is late, oh so late and its quite rude.

Future plans include a  new roof, elevated flower beds, new garage door, more exterior lights... the list goes on...  This will hopefully be in effect starting Summer 2012?


We also (with the help of my father-in-law), put pavers down the middle of the driveway (see here).  This is one of the best projects we did, it makes the front of the house look so much better!

Future plans here will include a larger front stoop, new railings, new roof above the front door that matches the roof line and extends further out for more coverage, nicely stained concrete front stoop and I'm sure a few other things...


I had to. They're too cute! :]

Here is the backyard.  It's bad. Real bad.


As you can see, we try to sit and enjoy the afternoon/evening sun we get back there but it's not a very nice place to hang out...

From the temporary steps, the unattached fence gate...

To the partially finished paint job, this space REALLY needs some TLC.  Lucky for you guys, you get to watch this ugly are get transformed into a fun inviting space for us and our guests to enjoy.
We are getting bids from all around on leveling and taking some dirt away. 

I had to. You can barely see their white little chests through the dirty glass. The dirty glass is their fault.

Stay tuned for the full details of our back yard plan!